Tuesday, October 19, 2010

Mango Konnyaku Pudding


It's been awhile now that I have not been making any agar-agar or pudding for the kids to eat. The main reason behind is "lazy"....LOL. But  thanks to seeing Wendy's blog, that I found out something that will definitely please the kids....and they will definitely love it to bits and pieces......Mango Pudding, the one that taste just like the favourites among kids and adults alike.....the brand named "COCON".....yes, you are right!!

My kids love this brand's Mango Pudding, they can easily pop it into their mouth not realising how many they have actually ate. Well, thanks again to Wendy of Table for 2 for sharing this recipe with us. Those of you who like the COCON mango Pudding should really try this out.......for me, I'm going to make it again for sure!

Here's the recipe and you can also get it from here.......^_^

MANGO KONNYAKU PUDDING

Ingredients
10gm Konnyaku Powder
200gm Castor sugar
1.5 Liter water
100gm Coffeemate / Creamer
200gm Mango Concentrate 
Nata de Coco (as much as you want)

Method
  1. Mix Konnyaku powder and castor sugar together in a bowl .
  2. Bring the water to a boil, add in creamer and stir until dissolve.
  3. Slowly spoon in the sugar and konnyaku powder mixture. 
  4. Set to low fire, stir well and let simmer for about 10 minutes. Stir one a while.
  5. Fill the pudding moulds with Nata de Coco.
  6. Turn the fire off, and stir in the Mango Concentrate. Stir to mix well.
  7. Spoon the mixture into the moulds, let stand in for a while, then transfer to the fridge to chill and set before serving.

Happy Mango Pudding Making!!

Sunday, October 17, 2010

Cookies & Cream Cheesecake

 
Cookies & Cream? Yes! another of my favourite when it comes to ice-cream or cheesecake. If I 'm standing in front of an ice-cream booth or browsing through a cheesecake menu, I will definitely not think twice if 'Cookies & Cream' is in the menu list....hehe, I just love this combination ......just like I love 'Rum & Raisins' and 'Coffee & Hazelnut'. Well, this time, I'm not making ice-cream though, but cheesecake with this combination......^-^

This recipe that I'm using today was already aging in my 'To Bake' list for about .... I think a year now?! Duh! I seriously need to stop collecting, but start baking .....LOL. Well, how can one stop collecting yummy and delicious recipes day by day when they just come flooding in everyday, by these lovely and talented bakers that I've been following for a year now........they are just seriously awesome people that I salute and got inspired from when it comes to baking. Continue to bake, I would say.......and I will continue to collect, and add to my list and of course, baking it off the list as fast as I can, hehe.....

This cheesecake is not too hard to make, but I would strongly suggest that you cut down on the sugar called for, as I have cut it down to 30gm (initial recipe called for 55gm of castor sugar) I still find it very sweet. The reason could be because this recipe also called for 'white chocolate' in it.......and the chocolate has then added extra sweetness to the cake......hmm, so take note on that. Overall, beside the 'too sweet' thing it's OK......and in fact yummy , hehe

This is the recipe if you would like to try and got it from here.

COOKIES & CREAM CHEESECAKE

 Ingredients
125gm Oreo biscuits (with filling)
75gm Unsalted butter
1 tsp powdered gelatin
200gm Philadephia Cream Cheese
150ml Whipping Cream
1/2 tsp vanilla extract
55gm caster sugar (I cut it down to 30gm)
100gm white chocolate, melted, cooled slightly (I cut it down to 80gm)
A small amunt of melted dark chocolate for the drizzle

Method:
Line a 4cm-deep, 15cm x 15cm pan with baking paper. (I used an 'Oval' shape tin instead)

Place 85g of the biscuits in a food processor and process until fine crumbs. Beat the butter until light in color then add the biscuit and beat lightly to combine.
Press into the base of the pan. Chill for 30 minutes. 

Sprinkle the gelatin over ½cup [30ml] cold water in a heatproof cup. Place the cup in a saucepan of gently simmering water and stir the gelatin until dissolved. 

Place the cream cheese, whipping cream, vanilla extract and caster sugar in the bowl of an electric mixer and beat until smooth. Stir in the gelatin mixture and the melted white chocolate. 
Roughly chop the remaining biscuits and stir through. (I did not put in any chopped Oreo biscuits as I don't have enough)

Pour the cream cheese mixture over the chilled base. Return to the fridge to set overnight. 
Drizzle with the melted dark chocolate, then return the the cake to the fridge for 15 minutes until set. Slice in the pan and serve.


Happy Cheesecake baking!

Wednesday, October 13, 2010

DURIAN MINI PUFFS

Wow!!! I must say so myself (with 3 'exclamation' marks.........my blog was so empty for the month of October, and it's already quickly approaching to mid –month, where you can see other bloggers have more than 5-6 entries posted, some even more L *Sigh*.......what can I say, I was hit with a 'lousy' and 'busy' month in September...and that drags on until recently, in fact, the effect is still there.

Sometimes, it's just so sad when you least expect your close friend would do something to betray you, and yet, they did. When you wish tomorrow will be a better day....and yet it turned out to be the worst day of your life. Then, when you try to pick up the pieces and start all over again........you are being hurt again the second time, this time even harder and deeper by the same person. When you think that tomorrow you can finally have some quality time with your loved ones......but you are working on a Sunday too. Well, that's life.........right? I know.....but sometimes it's just human to shout it out loud, eventhough you don't mean to shake the whole world up and tell them how do you feel right now. Who would care? Sometimes, I felt that we are actually living in a world of our own.......very big but yet so small too; lots of people around you, but yet you felt lonely....... L

What the h---!! I'm fine now.....those who have done damage to me, thanks to you, I've become even stronger!! So, let this be the first entry to October, a whole new month for me, and a whole new chapter has begun.......let the past be gone, and I knew my 'tomorrows' will be bright and sunny........with other true friends and those who loved me ^-^ cheers!!

And so......I have actually baked something in October, just that my mind was not there at that time to quickly post it up, therefore, here's the sum-up of what I have baked, in fact I have one that I totally forgot to take a picture of it, and that is my craving on "Carrot Walnut Cake with Rich Creamy Cheese frosting....hehe......despite I'm having a lousy mood, LOL


Recipe for this 'Peanut Butter cookies can be found here.
 

.....and the baking continues ;)

Tuesday, September 28, 2010

Mini Strawberry Shortcake


Have you ever heard of 'Strawberry Shortcake'? Yes, I have and maybe a lot of you do too……but the one that I heard very often is the "Strawberry Shortcake" cartoon that my little girl loves to watch in the Disney Channel,  :P  However, I do have a few recipes on Strawberry Shortcake that I have in my collection, that I planned to try out one of these days. Well, my "To Bake" list has increased tremendously over the year, each time the more interesting and more latest ones kept piling on the top and the older ones are all being forgotten and were kept on the bottom of the list already :P

Well, I think I have to stop the collection and start baking off the list as soon as I can, so that the new ones can be added in, hahaha. Anyway, back to Strawberry Shortcake, I get to finally try out this recipe, thanks to my dear nephew, Jason. He called me up on a fine day, asking if I have ever baked Strawberry Shortcake before. I told him that I haven't yet, but I do have a few recipe on this item. So, as I promised to test the recipe first before passing it on to him, I finally get to bake my 'Strawberry Shortcake'.

I went to buy a punnet of strawberries from one of the local supermarket and quickly get to work ……..in the kitchen I mean. I was very excited actually, because this is one type of cake that I am not familiar of, and heard quite a of lot comments about it. In fact, I have always wondered why people called it 'shortcake'?? It's small alright, but not short, hmm…….funny! Sometimes, you just don't know how they got their names. 


Anyway, I have selected the recipe that I have adapted from Smitten Kitchen as it looks so much easier and straightforward. Since my nephew prefers to opt for the easier and not so complicated one, then I would strongly suggest this recipe to him. I followed exactly what the recipe requires, and the only thing that I didn't wanna put into the ingredients was the 'egg yolks'. Don't worry, even I didn't put in the egg yolks, the shortcakes still turned out nice. The only thing would be the colour was not that yellowish or golden as it is supposed to be.

The final verdict for this Strawberry Shortcake would be …….the shortcake has a crumbly crust outside and a cake-like in the inside, overall it was fine for me. Then the filling, as the strawberries I bought was the local ones, so there are a bit sweet and sour, and when mixed with the whipped cream, it blends in really well, not too sweet. I like the final outlook of it as for a picture…..it really looks nice. Sadly, I have to say that I might not be making this again as it was not something that I would fancy or crave to eat in the near future……..maybe upon request, I will be baking it again, ^-^

Interested to see and taste how a Strawberry Shortcake is like? Check it out……..


STRAWBERRY SHORTCAKE 
adapted from Smitten Kitchen (Serves 6) 
Ingredients

224 gms all-purpose flour
50 gms sugar
1 tablespoon plus ½ teaspoon baking powder
2 hard-boiled egg yolks
1/8 teaspoon salt
84 gms cold unsalted butter, cut into ½ inch cubes
2 teaspoons lemon or orange zest (optional)
2/3 cup plus 1 tablespoon heavy cream


Shortcake assembly
1/2 pound strawberries, washed, hulled and quartered
2 tablespoons (25 grams) sugar
1 tablespoon lemon juice
1 cup whipping cream, beaten to soft peaks


Method:
  1. In the bowl of a food processor, combine the flour, sugar, baking powder, egg yolks, and salt. Pulse to combine. Add the butter and zest, if using, and pulse until the flour resembles coarse meal. Add 2/3 cup of cream and pulse until the dough comes together.
  2. Turn the dough out onto a lightly floured work surface and gather into a shaggy mass. Knead a couple times to make it into a cohesive mass and then pat it into a rough circle about 6 to 7 inches in diameter, and 3/4 to 1-inch thick.
  3. Using a sharp knife, cut the circle into 6 wedges and arrange on a parchment-lined baking sheet. Alternately, you can use a cookie cutter to make shapes of your choice. Chill for 20 minutes (and up to 2 hours).
  4. Preheat oven to 350°F. Brush the tops of the shortcakes very lightly with heavy cream and sprinkle lightly with the coarse sugar. Bake until risen and golden brown, 18 to 20 minutes. Turn the pan around halfway through to ensure even cooking.
  5. While the shortcakes are baking, toss the strawberries, sugar and lemon juice together in a bowl. Let stand several minutes. (If the strawberries are extremely firm, do this 30 minutes in advance.)
  6. Split the shortcakes in half horizontally and set the tops aside. Place the bottoms on dessert plates and heap strawberries over them. Spoon whipped cream generously over the strawberries and replace the shortcake tops. Serve immediately with any remaining whipped cream on the side.


Happy Strawberry Shortcake baking!! It's as sweet as the cartoon….LOL

Saturday, September 25, 2010

Cream Cheese Pound Cake


I have gone missing again I would have to admit…….not that I'm lazy to bake but…….just couldn't find the time to bake, to blog and to do most of what I like to do most recently, as I was being tied down so deep down with my work, sigh! Well, what to do, my 9-5 job is still my breadwinner, so couldn't afford to say "no" to it……therefore just have stick to it and follow with the rhythm …….if it goes low, then I will have a lot of time to do my stuff, but if it goes high (like now)…….I will just have to keep up with the pace :P

Anyway, no matter how busy I am, I still try once in awhile to squeeze in time, at least once a week to bake something , to heat up my oven and mixer………LOL. In fact sometimes, I like it when I heard my boys complaining to me saying, "Mummy, why you don't bake anything for us to bring to school lately? We hate to buy school canteen food." Hmm……I like the sound of that, hehe :P
By the way, coming back to this post, I actually can't quite remember when did I actually baked this, but I knew very well, it was very recent because after my little Angel's birthday project, I really didn't have the time to bake……unless I really squeezed in one very badly, ^-^  Well, who cares when, the main important is this cake is a really yummy and good one, a sure-keeper for me and I'm not going to hide it away from you, because I think you should try it. I remember hearing this from my MiL last year when I just started to bake, she said Pound Cake is just like Butter Cake. I'm not sure whether I have to agree with her or not, but when I googled on the internet, it says that Pound Cake got its name from the 'one pound' of each ingredients that it uses to make the cake………1 pound of sugar, 1 pound of eggs, 1 pound of flour and 1 pound of butter. Interesting huh? Can you imagine how rich and how big a cake with that measurement will be? LOL…..
Nowadays, I think this recipe has been altered by hundreds and many thousands and therefore, a Pound Cake is not made by using the above mentioned amount of ingredients already………but still more or less maybe. Anyway, back to this 'Cream Cheese Pound Cake' that I adapted the recipe from Smitten Kitchen , and the only thing that I opted out from the recipe was the 'Strawberry Coulis' as I don't think my kids and my in-laws would like that extra sauce for the cake. To tell you the truth, this cake turned out really good, both on texture and taste, in fact my my FiL complained that it was so soft, he couldn't even lift the cake from the plate……was that supposed to be good or bad? Hmmm………but my personal verdict was……it's really moist, very dense , the cream cheese blended in really well with the butter, therefore resulting a cake that is not very rich in cheese in taste, but just nice. I personally love it, I had 2 piece at one time and then swear I will not eat another piece again………haha, as to watch my waistline :P but I will definitely make this cake again.
Here is the actual recipe, I halve the recipe as I wanted to try out my newly bought 'Oval Shaped Cake tin', so I made two small cakes instead. You should try it:


CREAM CHEESE POUND CAKE 
Adapted from Smitten Kitchen, credit goes to you, Deb! 
Ingredients:
1 ½ cups (3 sticks) unsalted butter, at room temperature
1 package (8 ounces) Philadelphia brand cream cheese*, at room temperature
3 cups sugar
6 large eggs
1 ½ tsp pure vanilla extract
3 cups all purpose flour
1 teaspoon salt

**I added 1/2 tsp of lemon zest as I love the combination of cheese and lemon together


Method:
1. Preheat the oven to 325°F / 170°C. Lightly butter a 10-inch tube pan ( I used 2 small Oval shaped cake tin), then line the bottom with parchment paper.
2. Place the butter and cream cheese in a large bowl and cream with a mixer on medium speed until smooth. Add the sugar, increase the speed to high, and beat until light and airy, at least five minutes. Add the eggs, one at a time, beating after each addition and scraping down the sides of the bowl with a rubber spatula as needed. Add the vanilla, then the flour and salt all at once. Beat just until incorporated.
3. Pour the batter into the prepared pan and shake lightly to even out the top. Bake until the cake is golden brown and a toothpick inserted in the cake comes out clean, about 1 hour to 1 hour 15 minutes. (As I used 2 small Oval cake tin, my baking time was reduced to 50 minutes only).
4. Place the pan on a cake rack and cool for 20 minutes, then remove the cake from the pan and let it cool completely. Serve at room temperature.


Happy Baking!

Thursday, September 23, 2010

Mooncake ....or not? (1)


It's the month of September, meaning the Chinese calendar is in the 8th month of the year still.......and Mid -Autumn Festival aka Mooncake Festival falls in this month. When I was a little girl, I just don't seem to understand why mooncakes can only be eaten during Mooncake Festival and not any other day?? hmm......funny huh! 
Anyway, I think nowadays, people can make mooncakes to eat anytime and any day they feel like eating....eventhough it's not Mid-Autumn Festival. Last year, when I just started to bake in August, I was still very new to baking, so was not confident enough to bake some mooncakes, instead make some 'jelly mooncakes' for the kids.....something more simpler that does not requires so much research and skills....LOL 

This year, I challenged myself to try baking some tradisional mooncakes as Ian requested that I made some homemake 'lotus paste' mooncakes for him. Wah! that was quite a request though, as if he knew his mother would be able to bake some for him with just a snap of my fingers....:P
I started researching and googling in the internet, look through some other bloggers experience and tips on making mooncake, and of course bought myself a "mooncake cookbook" too.
Guess what, I didn't know that lotus paste or any other oft he mooncake fillings can be that demanding during this season.......almost all the cake ingredients chops in KK ran out of stock on these fillings. I went to BWM just a week before the actual Mid-Autumn festival, and was told that they sold every single pack of fillings (whether it is lotus paste, red bean, green bean or green tea or durian paste) a week ago. OK.......gotcha!! Now what?? I was asking myself what else can I stuff into these mooncake that Ian will eat? hmm.......
Then, consider myself lucky, one of the cashier at BWM told me that a lady informed them that she has extra packets of lotus paste and durian paste that she is willing to sell out to those interested at the same price she bought from BWM :)  She gave me the telephone contact number and I called to enquire, managed to secure a pack of lotus paste, phew!!!


And so, this year, I made some 'Mini Lotus Paste Mooncakes' for my family to taste for Mid-Autumn Festival, though I must say, I'm not very satisfied with the result of the mooncakes, it does not look as nice and pretty as the ones sold in the supermarkets........but one thing....it's edible and the kids loved it!! LOL
I will add this mooncake into my list of "To Bake" as I attempted to try it again, guess i found my weakness and mistake along the way, so, I'm not posting the recipes up here as yet until I have perfected it myself first.
Till then .................


Happy Mid-Autumn festival to you all!!

Thursday, September 16, 2010

My Little Girl is 6 Years Old Today


I'm sure every mothers in the world agree with me that they will try their very best and effort to make their children's dreams and wishes come true as much as they can. This year, my little girl, Angelica has wished for a 'Barbie Doll' cake ……and she specifically wanted me to bake it. In fact she has been asking for this cake since her last year's birthday……but because I only started to bake last year August, I really wasn't confident that I'll be able to come up with such a beautiful 'standing' doll cake.


Therefore, not to disappoint a little girl's wish, I struggled to make a 'sitting Little Mermaid' cake for her last birthday instead……..hehe. I wasn't very satisfied with that cake but......My little girl is a very 'easily satisfied' girl, and she loved it just as much. Therefore, I made a promise to her that this year when she celebrate her 6th birthday, I'll make a standing Barbie Doll cake for her, just the one she has always wanted.

As she also wanted to celebrate this year's birthday with her classmates for the last time in this pre-school (as she will be proceeding to Primary One next year) , she wanted a "Princess in Pink" birthday theme……..and I am more than happy to grant her her wishes…..^-^


And so, I made her these "Princess" theme cupcakes with the major color 'Pink'…….we have all the Disney's Princess character like Aurora of Sleeping Beauty, Cinderella, Snow White, Belle of Beauty and the Beast, Jasmine of Aladdin and Ariel of Little Mermaid……..of course, we also have some fairy magic wands, sweethearts, pink tiaras and some ice creams (one of Angel's favourite ……with lots of sprinkles on it) ;)


Besides that, I have also made some 'Sugar Cookies' for her to be packed into the party packs for her classmates. As this month's Daring Bakers Challenge is making 'Sugar Cookies', it's the perfect timing for me to bake some sugar cookies and also practice on decorating them too. Thanks to this month's Daring Bakers' host – Mandy from "What the Fruitcake?!".

Last but not least, the promised "Barbie Doll" cake that Angelica has always wanted. I'm glad everything came out perfectly as I wanted it to be, I'm very satisfied with the outcome this time, though I might not be perfect to some of you (who are much more experience in this field than me) but ….……for me, seeing my little girls' eyes lite up and her smiling face just froze there for period of time, the peck on my cheek and the little 'bear-hug' she gave me, tells me that she is very much appreciates my work and my effort in making her this year's birthday the 'happiest day in her life'........therefore all hard work and sleepless nights I put in for all these preparations……it all worth it! Cheers, Cynthia!! LOL


Happy Birthday Angel, my sweetie, you will always be my little angel and Mummy will try my very best to make your every wish come true!!


 May the good Lord bless you, Sweetie, Love you always……xoxo!!

Wednesday, September 8, 2010

FRUIT PASTRY CAKE

 
Yes, I'm finally baking something from my 'baking long list' again....LOL, but one sad thing is, my mixer broke down last Saturday after baking two batches of cupcakes......sigh***
I know, I know, it's time to get a more 'keng' (heavy-duty) one....that's what everybody is telling me :( I wish I can afford a 'Kitchen Aid' now, at this moment....that would be so cool and perfect at this timing, but hey, who doesn't know how much a KA cost......I'm not one that can easily come out with that kind of cash to buy something I wish I can.....as there are so many things that i need to take into consideration in. Well, that doesn't stop me from baking (sticking my tongue out, LOL), as I'm going to get a temporary one (to my affordability now) that will substitute my broken one just fine.......and can last me till beginning of next year, when I get my bonus, I'm going to get a really heavy-duty one for myself , if possible, a 'KA' , hehe
As mentioned, nothing can stop me from baking.......here's what I baked last night, one of the 'hot cakes' in the blogpost as far as I know for the past one month and is still hot now, it's called the "Fruit Pastry Cake".


Don't misunderstand me, it's not a 'fruit cake' that normally people bake for Christmas or Weddings, but this is something that is so perfect for an 'afternoon garden tea'.....well, why do I say that?? because the outlook of this pastry cake is just so beautiful, I would say, if you set it on a Victorian garden table, beside the expensive cups and saucers.....they'll just look great! So much imagination huh you would say.........LOL
Well, once in awhile, it's good to take your mind out and let it wander.......be imaginative and creative, and it'll be really colourful. I have had a very stressful and hectic past few weeks......so, I guess it's time I get back to my normal usual pace and unwind. Hope you agree with me that 'life sometimes are really full of surprises'.......'no matter it is for better or for worst, it always comes with a reason behind it, let's just be glad that we get to witness it', cheers!
I won't be drafting out the recipe here, as I have followed exactly from this recipe that I adapted from here, though the only thing I omitted was the 'blueberries, as I can't seem to find any :(


.........but the cake still turned out perfect, it's yummy and you'll love it.


Happy 'Fruit Pastry Cake' baking !! 


Monday, September 6, 2010

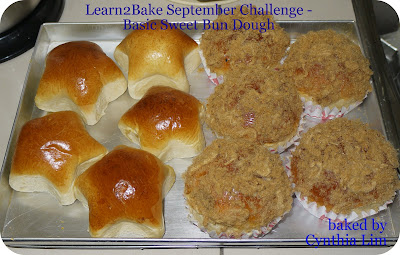
Learn2Bake September Challenge - Basic Sweet Bun Dough


Another of the Learn2Bake Challenge, and this time I have chosen 'Basic Sweet Bun Dough' for my members to do, since they have been baking cakes and cakes a lot....some of them even begged me to change to something else.......LOL , so 'kelian' (pity) ^-^
Ok, so buns and bread will be our topic for the whole of September!! Guess what, even I myself can't wait to quickly get this challenge done.....as I have told you before, I'm a bread person, and all my boys are.......even my little girl, Angel also started to like bread and buns too.....but she prefers the plain ones :)
Secondly is because I have been baking a lot of cupcakes lately since I started to go back to baking after a few weeks of absence, hehe....
I have given them a few parts to complete and choose, as most of you who are very familiar with bread baking, would know that, you only need a "basic sweet bun dough' to transform and create a varieties of other buns that are sold in local bakeries. I have selected the 'Basic Sweet Bun Dough' recipe from my cookbook collection called "BreadMagic" by Chef Alan Ooi, this is a good cookbook that you should invest  I would say.
As for the parts of the variety buns, I picked and chosed from a few cookbook......and I'm glad to announced that I completed my challenge pretty early this month and I'm so happy, as I have more time to do other baking list that I have........see ya!


Happy Basic Sweet Bun Dough Baking!!
Friday, September 3, 2010

Forgive me for my absence lately........

Gosh! Time has really flies by so fast without me realising that it's already September......and I haven't been posting any latest bake so far. Please forgive me as the last 2 weeks of August was a nightmare to me.......all my 4 kids were down with high fever, cough and flu and sore throat. I don't know when was the last time something like this happened in the past........but it sure gives me enough sleepless nights, and rushing up and in and out of the clinic, seeking for doctor's advice and requesting for medical leave for the kids, as 3 of my boys are hit at the time when the 2nd term examination is on.......Sigh!!

Therefore, I was left with no time to think of anything else (definitely not baking) but only what time and what doses of medicine to give to which kid.......round the clock. Come to think of it now, I'm quite good with the medicine names, doses and also the exact weight of each of my children, says the phamarcist when I went to purchase medicine for them. I can spell out everything she wants to know without a blink........LOL, I guessed this shows how much I'm a "Mumto4Angels" is.......LOL

Anyway, I promise I will try to go back to baking like usual this September........so not to neglect those challenges that I joined, and also to those who faithfully follow my blogs ^-^
By the way, I have just started to venture into a small cupcakes business on my own called "Cupcakes Fairytale" , from home, on a very small scale, just to cater to those friends who used to order from me. Please do feel free to pop into this link and well, if you would like to try .........I would be happy to be a part of your fairytale.

Lastly, this is what I found 'weird' during my absence while I was baking one batch of my cupcake orders, hehe. Seen anything like this before?

Tuesday, August 17, 2010

HOKKAIDO CHIFFON CUPCAKES


Nope, I have never been to Japan nor Hokkaido, not yet…….but will definitely make a "Wishlist" with this destination in it ;) So, the idea of baking these "Hokkaido Chiffon Cupcakes" came by when I was blog hopping as usual. I think I spend most of my spare time, if not baking……..will be reading cookbooks or blog hopping. Well, that's how I got all my recipes collection piling up :PAnyway, these Hokkaido Chiffon cupcakes can be quite discouraging when you first look at it in a picture or blog…….it sinked, shrinked and has a wrinkled surface……totally the opposite of a cupcake……..I meant a cupcake that hasn't been dressed also can easily 'sapu' (sweep) this title of a perfect cupcake………LOL
You must be wondering then 'why on earth do I still take the initiative to bake it', right?? Yeap, anything that I saw looks interesting always caught my attention and these Hokkaidos' Cuppies sure did when I saw them. I was thinking why do they have such a special name……..and why do they look like that?? I googled and typed in "What is Hokkaido Chiffon Cupcakes?" hoping that I will be able to find out the source of these cupcakes, if they really are from Hokkaido, Japan. Guess what? "There was no such search result"……hah! So, where and why are they named Hokkaido? Not Holland? Duh!
So, I thought since I can't get the background of these cupcakes origin, then the least I can do is bake and try to see what's so special about them. And so I did……….verdict is ……it's light and fluffily soft like cotton in texture, the taste is also very light , just like a Chiffon Cake :P The egg whites is whisk to medium stiff peak, and folded in to the batter……that is why it is so light and fluffy. I would say I will make this cupcakes again, although I still doesn't understand why they want to add Hokkaido into the name……..well, simply because I prefer something light and not so heavy, and for your information, I ate 5 cuppies without realizing it….hehehe


 HOKKAIDO CHIFFON CUPCAKES
Ingredients
(A)
4 egg yolks
70gm castor sugar
(B)
2gm salt ( I used a pinch of salt)
Drops vanilla essence (I use ½ tsp of vanilla essence)
(C)
80ml milk (I used Low Fat Milk)
60ml Corn Oil (I used Canola Oil)
(D)
135gm plain flour
4gm baking powder (I used ½ tsp baking powder)
(E)
6 Egg whites
50gm castor sugar

 Method
  1. Preheat oven to 180 degree C.
  2. Arrange paper cups on baking tray.
  3. Hand whisk (A) until pale in colour. Add (B).
  4. Follow by (C). Whisk until combined.
  5. Sieve in (D). Stir until well mixed.
  6. Whisk egg whites until foamy, add sugar. Whisk until medium peak.
  7. Take 1/3 whites and fold in with yolk mixture.
  8. Follow by folding in the rest of the egg whites.
  9. Scoop batter into pre-arranged paper cups filling about ¾ full.
  10. Bake for 20-25 minutes.


Happy Hokkaido Chiffon Cupcakes baking!


The recipe was adapted from here.

Monday, August 16, 2010

Brioche II ……..In a Loaf


I think falling in love with something that you like is really a very wonderful feeling…..you just wanted to see it every now and then, and you won't get bored of it no matter how many times it appears in front of you, and you just wanted to have it 24 hours a day………..true or false? Haha……..no lah, I'm not talking about me, but to those people who are in love…….hehehe ;) Anyway, my love affection for Brioche is so much so reach the level where I just wanted to make it whenever I have the time……..and that is exactly what I did today. I have been collecting recipes of almost everything from cupcakes to cheesecakes, muffins to bread, cookies to brownies and so forth, the list is just endless. At first I have a ring file full of recipes of about 100 pages in the bookshelf……..then within a month, it increases with a 2nd ring file and a few cookbooks…………then the collection increased again……..to 4 ring files and more than 10 cookbooks………..now, it's been a year already, the collection is endless and so are the cookbooks. I sometimes even think I must have gone crazy when I actually read a cookbook like I'm reading a novel…..…..geez, I hope I have company here, LOL ^_^
Well, that's how crazy I can be at times……..so, I have a few good ole 'Brioche' recipes that I have collected while browsing the WWW. I have tried one of it before where you can find it here. This time I attempted the other recipe where I got it from the Australian Gourmet Traveller Magazine – June 2010 issue. It was a Brioche made into a loaf instead of the previous one where I made them into individual buns.
I totally agree with the article commenting that Brioche would have to be one of French cuisine's greatest gift, as this bread is so rich and delicious, that it is a 'star' in its own right, and needs little in the way of embellishment (as quoted in the magazine). So true !!
Well, needless for me to introduce it further……some of my friends who saw the picture of my Brioche in Facebook, couldn't wait for me to post the recipe up, hehe……because it's just so tempting. Here it is as promise………;)


 BRIOCHE II (IN A LOAF)
Ingredients
160 ml milk (I used low fat milk)
1½ tsp instant dried yeast
5 eggs yolks, at room temperature, lightly beaten
375gm plain flour, plus extra for dusting
30gm castor sugar, plus extra for dusting    
A pinch of salt
150gm butter, dices and softened, plus extra for greasing
Some Egg yolk for eggwash

 
Method
  1. Warm milk in a small saucepan over low heat until lukewarm. Combine yeast and ½ the milk in a bowl, stirring to dissolve. Stand in a warm place until foamy (8-10 minutes).
  2. Whisk remaining milk with egg yolks in a bowl and set aside.
  3. Mix flour, sugar and a pinch of salt in the bowl of an electric mixer, fitted with a dough hook, until combined. (FYI, this recipe does not requires hand –kneading). Make a well in the centre, add yeast mixture and yolk mixture. Beat on medium speed until a smooth dough forms (4-5 minutes).
  4. While mixing, gradually add 1/3 of butter at a time, beat until dough is elastic and pulls away from sides of bowl (8-10 minutes).
  5. Transfer dough to a lightly buttered bowl, cover and stand until doubled in size (1½ -2 hours).
  6. Knock back dough, knead on a lightly floured surface until smooth, shape dough into a loaf and place in a 11cm x 24cm loaf tin buttered and lined with baking paper. (I did not lined with baking paper, I just lightly greased the loaf tin only and it did not stick too). Cover, stand until doubled in size (30 minutes – 1 hour). Meanwhile preheat oven to 180 degree C.
  7. Brush top with eggwash, dust with sugar, bake until golden and risen (25-30 minutes).
  8. Remove from tin, place on a baking tray lined with baking paper, return to oven until sides are golden (8-10 minutes), cool on a wire rack.


Happy Brioche Baking folks!


Sunday, August 8, 2010

My brother’s 25th Silver Wedding Anniversary


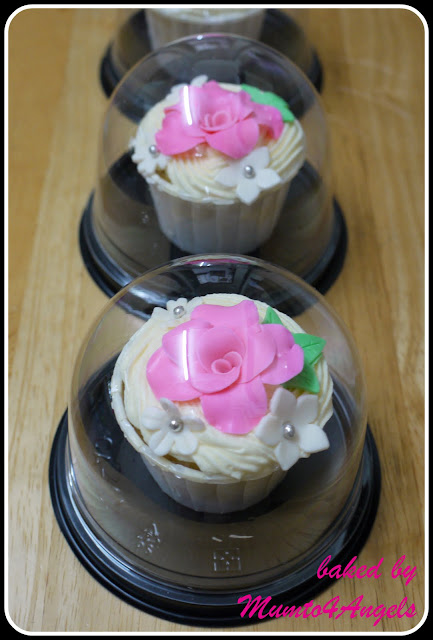
It's the month of August…….and my brother Anthony, and his wife, Celine will be celebrating their 25th wedding anniversary on the 7th August. 25 years of marriage is definitely something to celebrate and also to remember especially when they have been blessed abundantly by God with 5 beautiful children and a very healthy and happy family. I am so happy and at the same time, excited for them too. My niece, Aline, their eldest daughter told me about this celebration a month ago, and a lot has been prepared and lined up for the celebration. I have arranged for my two sisters from KL to come back just in time for the celebration, while the rest of the siblings and nieces / nephews are a bit tied up with their work L But, nonetheless, they are remembered in our hearts during the celebration. I have also decided to make some cupcakes as a gift to the guest during the dinner for this occasion, and my little niece, Sheryl, who loves to bake, agreed to help me out.
So, 2 weeks before the actual date, I have already started with the gum paste flowers and decoration ideas. I haven't been playing with gum paste for quite some time since the last time was during Chinese New Year. I think it's time I catch up again on my rolling, coloring and molding of the flowers, petal by petal, the leaves and the tiny flowers. It's always fun to do all that…….the only thing would be, it's a little time consuming and a lot of patience is required J
I got all the flowers done in 4 days, and work out a mock sample for my niece to see a week before the event. All 5 of them are very happy with it and so I set the day to bake the cupcakes a day before the celebration, at my brother's house, as my little niece would like to help me out J So, it was Friday evening, I went to her house after work, we started baking 80 cupcakes at around 7pm and then started the buttercream piping, the decoration and finally, the packing ……..we finished up everything by 10pm, I would say, that was FAST!! YEAH!!
So, I headed home and was very pleased everything went well and the here are the photos of the cupcakes and some photos of the celebration too…….cheers!


                                         ........and here is one of my angel, Daniel.......:)